Landscape photography and scenic train journeys are a match made in heaven. The ever-changing vistas, unique perspectives, and captivating landscapes accessible by rail provide photographers with unparalleled opportunities to capture breathtaking images. As you glide through diverse terrains, from majestic mountain ranges to sprawling coastal scenes, the train becomes your mobile studio, offering a constantly evolving canvas for your artistic vision.
Mastering the art of photographing landscapes from a moving train requires a blend of technical skill, creative composition, and adaptability. Whether you're an experienced photographer or an enthusiastic beginner, the challenges and rewards of train-based landscape photography can elevate your craft to new heights. Let's explore the techniques, gear, and iconic routes that will help you create stunning visual narratives of your scenic rail adventures.
Mastering composition in railway landscape photography
Composing striking images from a moving train presents unique challenges and opportunities. The key lies in quickly identifying and framing compelling scenes as they unfold before you. By mastering a few essential compositional techniques, you can dramatically improve the impact and visual appeal of your railway landscape photographs.
Rule of thirds application in moving train shots
The rule of thirds is a fundamental principle in photography that can significantly enhance your train-based landscape shots. Imagine your frame divided into a 3x3 grid, with two horizontal and two vertical lines. Positioning key elements of your composition along these lines or at their intersections creates a more balanced and visually appealing image.
When shooting from a moving train, try to align the horizon with either the upper or lower horizontal line, depending on whether you want to emphasize the sky or the foreground. Place points of interest, such as mountains, trees, or architectural elements, at the intersections of these lines. This technique adds depth and draws the viewer's eye through the image, creating a more engaging composition.
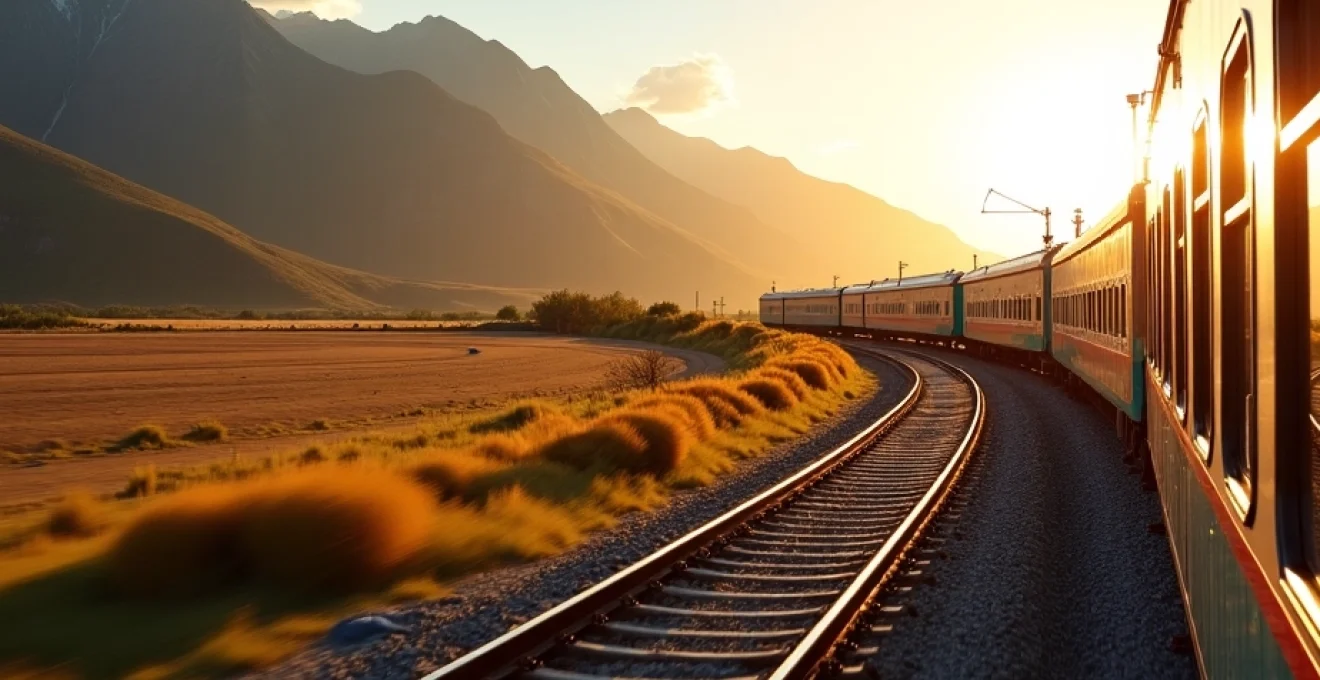
Utilizing leading lines with railway tracks
Railway tracks provide natural leading lines that can guide the viewer's eye through your photograph. When composing your shot, look for opportunities to incorporate these strong linear elements. The converging lines of the tracks create a sense of depth and perspective, drawing the viewer into the scene.
Experiment with different angles and positions within the train to capture these leading lines effectively. Shooting from the rear of the train can create a powerful sense of journey and distance, while side-on views can use the tracks to lead the eye towards distant landscapes or points of interest.
Framing techniques through train windows
Train windows offer a ready-made frame for your landscapes, adding context and depth to your images. Use the window frame to create a natural border around your subject, focusing attention on the scenery beyond. This technique not only adds visual interest but also conveys the sense of being on a journey.
Experiment with different window positions and angles. Clean, unobstructed views can create crisp frames, while partially opened windows can add an element of texture and dimension to your shots. Don't be afraid to include reflections or elements of the train interior to add context and create more layered, complex compositions.
Balancing foreground and background elements in transit
Creating a sense of depth in your railway landscape photographs often involves balancing foreground and background elements. While the distant scenery may be your primary subject, including foreground elements can add context, scale, and visual interest to your images.
Look for opportunities to incorporate nearby landscape features, such as trees, rock formations, or even parts of the train itself, into your foreground. These elements can serve as anchors for your composition, leading the eye towards the main subject in the background. Remember to adjust your focus and depth of field to ensure both foreground and background elements are appropriately sharp or blurred, depending on your creative vision.
Optimal camera settings for scenic train photography
Capturing stunning landscape photographs from a moving train requires a solid understanding of your camera settings. The constant motion, changing light conditions, and limited time to compose shots all present unique challenges. By mastering key camera settings, you can ensure you're always ready to capture the perfect moment as it unfolds before you.
Shutter speed techniques for motion blur effects
Shutter speed is crucial when photographing from a moving train. Faster shutter speeds will freeze motion, capturing crisp details of the passing landscape. For sharp images, aim for shutter speeds of 1/500th of a second or faster, especially when shooting distant subjects.
However, don't shy away from experimenting with slower shutter speeds to create a sense of motion. Shutter speeds between 1/15th and 1/60th of a second can produce an interesting blur effect on the immediate foreground while keeping distant subjects relatively sharp. This technique conveys the sensation of movement and speed, adding dynamism to your images.
Aperture selection for depth of field control
Choosing the right aperture allows you to control the depth of field in your railway landscape photographs. A wider aperture (smaller f-number) like f/2.8 or f/4 will create a shallow depth of field, blurring the foreground or background. This can be effective for isolating specific elements in the landscape or creating a dreamy, soft focus effect on distant scenery.
For scenes where you want maximum sharpness throughout the frame, opt for a smaller aperture (larger f-number) such as f/11 or f/16. This increases the depth of field, keeping both near and far elements in focus. Remember that smaller apertures require more light, so you may need to adjust your ISO or shutter speed accordingly.
ISO management in varying light conditions
Light conditions can change rapidly when traveling by train, especially when passing through tunnels, forests, or urban areas. Being able to quickly adjust your ISO is essential for maintaining proper exposure in these varying conditions.
In bright daylight, keep your ISO as low as possible (e.g., 100 or 200) to minimize noise and maximize image quality. As light levels decrease, be prepared to increase your ISO. Modern cameras can produce excellent results at higher ISOs, so don't be afraid to push it to 800, 1600, or even higher if necessary to maintain a fast enough shutter speed for sharp images.
White balance adjustments for scenic color accuracy
Accurate color reproduction is crucial for capturing the true essence of the landscapes you encounter. While auto white balance can often produce good results, taking control of this setting can elevate your images, especially in challenging lighting situations.
Consider using the "daylight" or "cloudy" presets for most outdoor scenes, adjusting as needed based on the actual conditions. For sunrise or sunset shots, the "shade" setting can enhance the warm golden tones. If you're shooting in RAW format (highly recommended for maximum flexibility in post-processing), you can fine-tune the white balance later without losing image quality.
Iconic scenic train routes for landscape photographers
The world offers a wealth of breathtaking train journeys that serve as perfect subjects for landscape photography. From alpine vistas to coastal panoramas, these iconic routes provide a constantly changing backdrop for your creative vision. Let's explore some of the most photogenic rail experiences around the globe.
Capturing alpine vistas on Switzerland's Glacier Express
The Glacier Express, often called the slowest express train in the world, offers an unparalleled opportunity to capture the majestic beauty of the Swiss Alps. This 8-hour journey between Zermatt and St. Moritz takes you through a landscape of snow-capped peaks, pristine valleys, and charming mountain villages.
The train's panoramic windows provide excellent vantage points for photography. Be prepared to capture the dramatic Oberalp Pass, the Rhine Gorge (Switzerland's Grand Canyon), and the iconic Landwasser Viaduct. The ever-changing scenery ensures a diverse portfolio of alpine landscapes, from lush green meadows in summer to snow-blanketed wonderlands in winter.
Documenting coastal beauty via California's Pacific Surfliner
For a different but equally stunning landscape, the Pacific Surfliner offers a photographer's dream journey along the California coast. Running from San Luis Obispo to San Diego, this route hugs the Pacific shoreline, providing endless opportunities to capture the golden beaches, rugged cliffs, and sparkling ocean vistas of the Golden State.
The section between Santa Barbara and San Diego is particularly photogenic, with the train often running mere feet from the ocean. Sunset shots are especially rewarding, as the warm light bathes the coastline in golden hues. Keep your camera ready for wildlife sightings too, including dolphins and seabirds.
Framing autumn foliage on Japan's Kurobe Gorge Railway
Japan's Kurobe Gorge Railway offers a spectacular journey through one of the country's deepest ravines, particularly breathtaking during the autumn foliage season. This narrow-gauge railway winds through the steep-sided gorge, crossing bridges and passing waterfalls, offering a constantly changing palette of reds, golds, and greens.
The open-air carriages provide unobstructed views and excellent photography opportunities. Focus on capturing the contrast between the vibrant autumn colors and the rugged terrain. The Shin-Yamabiko Bridge, spanning a deep chasm, offers a particularly dramatic backdrop for your shots.
Shooting desert landscapes from Australia's Ghan
For those seeking to capture the raw beauty of the Australian Outback, The Ghan offers an epic 2,979-kilometer journey from Adelaide to Darwin. This iconic train traverses the heart of Australia, providing a unique perspective on the country's vast desert landscapes.
The ever-changing scenery, from the rusty reds of the MacDonnell Ranges to the lush tropical regions of the Top End, offers diverse photographic opportunities. Dawn and dusk are particularly magical times, as the low sun paints the landscape in warm, ethereal light. Be prepared to capture the stark beauty of the desert, unique rock formations, and perhaps even native wildlife.
Essential gear for train-based landscape photography
Successful train-based landscape photography requires careful consideration of your equipment. The unique challenges of shooting from a moving vehicle, often in confined spaces, demand a specialized gear setup. Here's a guide to the essential equipment that will help you capture stunning images on your scenic rail journey.
Vibration reduction lenses for image stabilization
Vibration reduction (VR) or image stabilization (IS) lenses are invaluable when shooting from a moving train. These lenses use built-in technology to counteract camera shake, allowing you to shoot at slower shutter speeds without compromising image sharpness. This is particularly useful in low light conditions or when you want to create motion blur effects.
Consider investing in a versatile zoom lens with VR/IS capability, such as a 24-70mm or 24-105mm. These ranges cover wide-angle to short telephoto, suitable for most landscape scenarios you'll encounter on a train journey. For more distant subjects, a stabilized telephoto zoom like a 70-200mm can be extremely useful.
Tripod alternatives for confined train spaces
While a traditional tripod is often impractical in the confined space of a train, there are several alternatives that can help stabilize your camera:
- Mini tripods or tabletop tripods: These compact supports can be placed on windowsills or tray tables.
- Clamp mounts: These can be attached to various parts of the train interior for stable shooting.
- Bean bags: Versatile and adaptable, these can be molded to support your camera on uneven surfaces.
- Monopods: More compact than tripods, these can provide stability without taking up much space.
Experiment with these options to find what works best for your shooting style and the specific conditions of your train journey.
Polarizing filters for glare reduction through windows
A circular polarizing filter is an essential tool for train-based landscape photography. It helps reduce glare and reflections from train windows, enhancing the clarity and color saturation of your images. This is particularly useful when shooting through tinted windows or in bright sunlight.
When using a polarizing filter, be mindful of its effect as you rotate it. The degree of polarization changes as you turn the filter, allowing you to fine-tune the effect. Remember that polarizers work best when shooting at right angles to the sun, so consider this when choosing your shooting position within the train.
Weather-sealed equipment for outdoor platform shots
Many scenic train journeys offer opportunities to shoot from outdoor platforms or during stops. Weather-sealed cameras and lenses provide peace of mind when shooting in diverse conditions, from misty mountain passes to dusty desert landscapes.
Invest in a weather-resistant camera bag to protect your gear during the journey. Quick-access designs allow you to swiftly retrieve your camera for unexpected photo opportunities. Don't forget to pack lens cleaning supplies to keep your glass free from dust, fingerprints, and water droplets that can affect image quality.
Post-processing techniques for train landscape images
Post-processing is a crucial step in refining and enhancing your train-based landscape photographs. It allows you to overcome some of the challenges inherent in shooting from a moving vehicle and bring out the full potential of your images. Here are some key techniques to consider in your post-processing workflow.
Color grading to enhance natural scenery
Color grading can significantly impact the mood and atmosphere of your landscape photographs. When working with images captured from a train, focus on enhancing the natural colors of the scenery while maintaining a realistic look. Start by adjusting the white balance to accurately represent the scene's temperature and tint.
Use the HSL (Hue, Saturation, Luminance) panel in your editing software to fine-tune specific color ranges. For instance, you might boost the greens and blues to enhance lush landscapes and skies, or warm up the golden hues in a sunset shot. Be careful not to oversaturate; subtle adjustments often yield the most pleasing results.
Noise reduction methods for low-light train interiors
Shooting in low-light conditions, such as inside a dimly lit train carriage or during early morning and evening hours, can introduce noise into your images. Effective noise reduction is crucial for maintaining image quality without losing important details.
Start with the built-in noise reduction tools in your editing software, adjusting both luminance and color noise. For more advanced control, consider using specialized noise reduction plugins. Apply noise reduction selectively to different areas of the image, focusing on smoother areas like skies while preserving detail in more textured regions.
Perspective correction for architectural elements
When photographing buildings or other architectural elements from a moving train, you may encounter perspective distortions, particularly with wide-angle lenses. Post-processing tools can help correct these issues, creating more natural-looking images.
Use the lens correction and transform tools in your editing software to adjust vertical and horizontal lines. This can help straighten leaning buildings or correct the convergence of parallel lines. Be mindful not to overcorrect, as some perspective can add depth and dynamism to your images.
HDR blending for high contrast scenic shots
High Dynamic Range (HDR) techniques can be particularly useful for train-based landscape photography, where you often encounter scenes with extreme contrast between bright skies and shadowy foregrounds. While it's challenging to shoot multiple exposures from a moving train, you can still apply HDR principles to a single RAW file.
Use the shadows and highlights sliders in your editing software to recover detail in both the darkest and brightest parts of your image. For more control, consider using luminosity masks to selectively adjust different tonal ranges. Aim for a natural look that preserves the scene's original atmosphere while revealing details that might have been lost in a single exposure.
Remember, the goal of post-processing is to enhance your images while maintaining their authenticity. Strive to create photographs that accurately represent the breathtaking landscapes you encountered on your scenic train journey, allowing viewers to experience the beauty and wonder of these remarkable destinations through your lens.